How to Use Instagram Stories & Reels as Marketing Tools
Instagram Stories & Instagram Reels are both popular ways to share video content. To build your brand, you can utilize both to engage different audiences on the platform. But what are the differences between the two content strategies? And what individual benefits do they each possess?
Benefits of Instagram Stories & Reels
While both Instagram Stories & Reels increase engagement, they have different benefits regarding audience reach.
Instagram Stories
Instagram Stories allow you to share a wide range of content, including photos, videos, polls, surveys, and other creative material.
Posting to your Instagram Story can help build relationships with your followers, and doing so regularly can cause your followers to look forward to your content. Also, since content posted on your Instagram Story disappears after 24 hours, it provides a sense of authenticity and exclusivity.
Stories also gives you more opportunities to engage directly with your followers since you can share interactive content like infographics, quizzes, surveys, polls, links, and more.
Furthermore, Stories can help you learn more about your online community. You can see who engages with you and what content they like. By connecting with and catering to your followers, you can build a stronger online community for your brand.
Instagram Stories are also discoverable, which means they can be seen by accounts that do not follow you. For example, the Instagram algorithm will show your Stories on the Explore page and recommend them to accounts not currently following you based on who they already follow. So, utilizing the Stories feature can help build brand awareness and increase followers.
Instagram Reels
Utilizing video marketing, such as Reels, has a direct positive impact on engagement and sales. Video media is the most effective way to engage audiences and hold their attention. Static Instagram photo posts are a much more challenging way to grab your audiences’ attention.
Instagram Reels are the easiest and cheapest way to utilize this media as they don’t require a production budget or expensive equipment. All you need to create a successful Reel is a smartphone! Plus, the Instagram app already features creative tools and a music library to help you film, design, and edit your quality video.
Reels also allow you to get creative and post various promotional videos. For example, you can create tutorials, show off creative processes, showcase products, answer customer questions, and more.
Lastly, the Instagram algorithm loves Reels. Videos are more likely to go viral and are sure to earn engagement because they get more interactions than traditional Instagram videos.
Traditional Instagram videos only appear on an account’s main feed, while Reels will additionally appear on the Reels page. This allows users to discover a wide range of videos from different accounts as they scroll through the Instagram Reels page, similar to how users scroll on TikTok.
Instagram users typically want to see short video content, and accounts that utilize this feature are rewarded with reach and user engagement. So, it is a win-win situation!
How To Post An Instagram Story
Post to Your Story Using the “Create” Button:
- Log into the Instagram app
- Select the “Create” [+] icon in the center of the toolbar at the bottom of the screen.
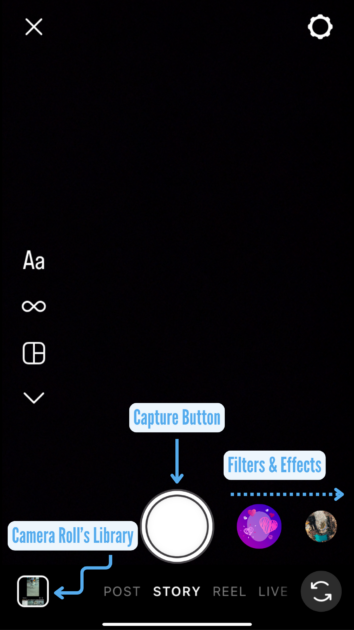
- Select “STORY” by tapping or swiping at the bottom of the screen until it appears under the white circular Capture Button.
- You can either upload content you’ve already captured or record/create something new.
- To add content from your Camera Roll’s Library, tap on the small square in the bottom left-hand corner of the screen.
- To take a new photo, tap the Capture Button in the lower center of the screen.
- If you hold that same circle down, it’ll start to record a video instead. Release the circle to stop the video.
- Select the flip button in the bottom right corner to switch between your front and back camera.
- You can also swipe the white circular Capture Button to the left to discover AR Effects and Filters you can use.
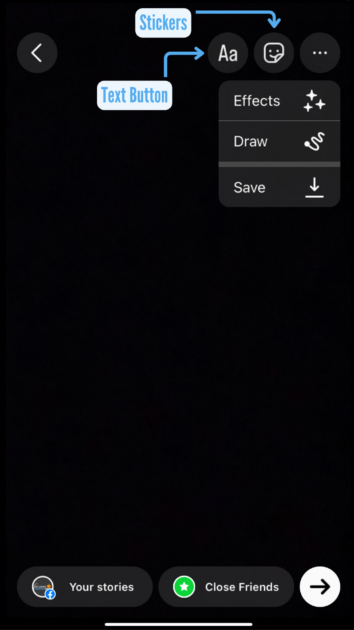
- Once your content is uploaded or recorded, You can add text by tapping anywhere on the screen or selecting the Text Button in the top right corner to add and edit text.
- Next to the Text Button, you’ll also find the Stickers Button, which gives you various graphics and add-ons, such as products, music, location tags, hashtags, polls, questions, countdowns, links, and much more.
- Furthermore, you can click the Three Dots in the top right corner to add Effects, Draw, or Save your Story Post.
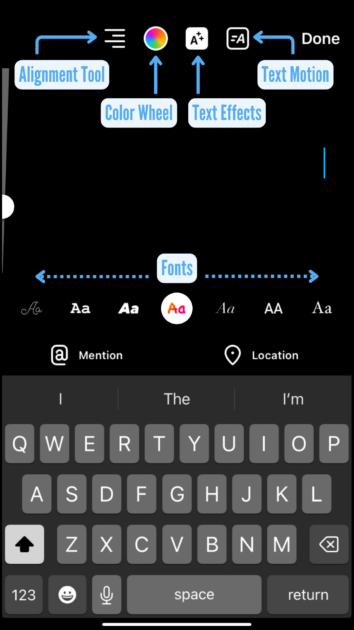
- If you add text to your Story, there are various tools you can utilize:
- Use the Alignment Tool to align your text to the left, right, or center of the screen.
- Use the Color Wheel to change the color of your text. You can use the color picker to choose a color on the screen, scroll through the existing color options, or hold down the color to pull up a color wheel to adjust the color.
- Use the Text Effects Button to highlight your text. Tap the button multiple times to see the different variations.
- Use the Text Motion Button to add movement to your text (the motion will vary depending on the font selected). Or tap it again to turn off the feature.
- Scroll across the screen to change the selected Font.
- Click the Mention Button to tag another account in your Story.
- Click the Location Button to tag a location in your Story.
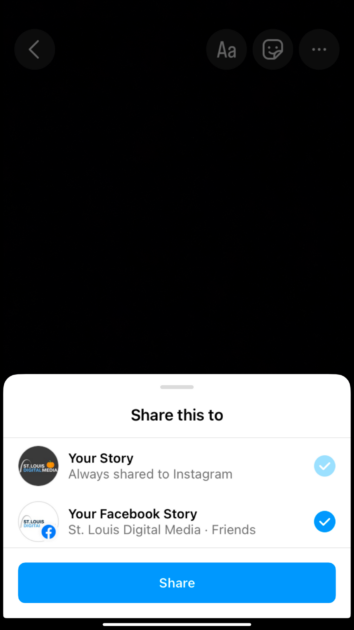
- Once you are happy with your content, select “Your Story” on the bottom left of the screen to Publish!
- If the button says “Your Stories,” you can hold it down and select if you’d like to share to Facebook or other connected accounts as well:
- If the button says “Your Stories,” you can hold it down and select if you’d like to share to Facebook or other connected accounts as well:
Post to Your Story Using the Profile Icon:
- Log into the Instagram app
- Go to your profile and tap the small blue (+) in the corner of your profile picture:

- A grid will appear showcasing your camera roll for you to choose from, or to take a new photo/video, tap the black camera icon in the first square of the grid, in the top left corner of the screen.
- Refer to Steps 4 through 7 above
How To Post An Instagram Reel
Unlike Instagram Stories, there’s only one place on Instagram to create and upload Reels.
- Log into the Instagram app.
- Select the “Create” [+] icon in the center of the toolbar at the bottom of the screen.
- Select “REEL” by tapping or swiping at the bottom of the screen until it appears under the white circular Capture Button.
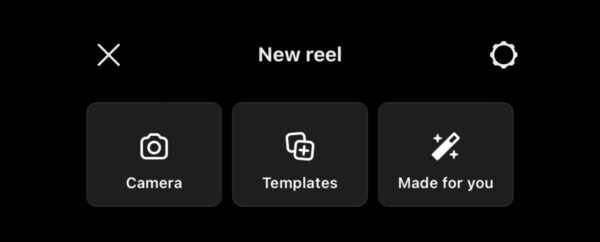
- A grid will appear showcasing your camera roll for you to choose from, and above it, you’ll find the Camera Button to capture a new video, Templates to build a Reel from, and Made for You, which are Reels made by Instagram from your archive.
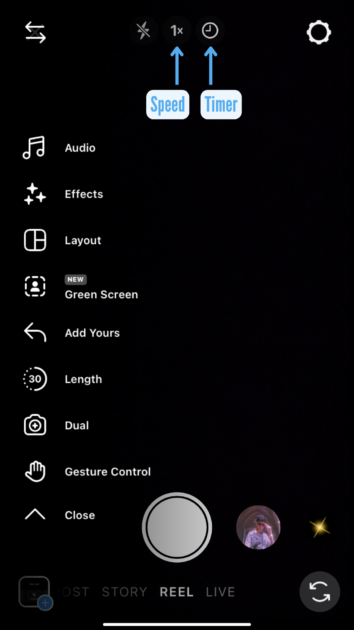
- To take a new video, tap the Camera Button. This will take you to a screen that looks similar to when creating Instagram Stories with the Capture Button in the lower center of the screen.
- Before filming any videos, you can click the Timer Button to set how long you want the clip to be filmed and add a 3- or 10-second countdown before recording starts.
- You’ll also find the Speed Button at the top to change the pace of your video.
- While you are still uploading and filming videos, you’ll find the following on the left-hand side of the screen:
- Audio – tap this to search or import music to add to your Reel.
- Effects – similar to Snapchat filters and allow you to change the appearance of your video before recording.
- Layout – allows you to split the screen into multiple videos
- Green Screen – turn on to mask your background as if you have a green screen, you can choose from background Instagram offers or your camera roll.
- “Add Yours” Stickers – these allow you to add your Reel to any topic you want that others are also posting to.
- Length – pre-set how long you want your Reel to be
- Dual – film on your front and back camera at the same time
- Gesture Control – turn this on, and you can start and stop the video by raising your hand
- Once you have all your footage, select “Next“
- This will take you to an editing screen where you can reorder your clips and add audio, stickers, text, filters, and effects (refer to Step 6 under How To Post An Instagram Story).
- Once you’re happy with the content, tap “Next” or the arrow in the top right corner.
- On the next screen, you can select a cover photo and write a caption. If you scroll down, you can tag products/people, add topics and a location, and choose to recommend to Facebook.
- Cover Photo – changes the display image that will appear on your main feed layout grid.
- Write a Caption – add context to your content for your viewers.
- Also Share to Feed – toggle this feature to share to your feed as well; if turned off, your Reel will only post to your Reels Tab
- Tag People & Tag Products – tag products or people in your video to make them easy to find for viewers.
- Add Message Button – adds a message button to the bottom of your post; sends messages to your Instagram inbox.
- Add Topics – choose up to three topics to help Instagram identify the content and match your video to the best viewers.
- Add Location – lets users know the location where your video was filmed.
- Add Reminder – add a reminder with event details that viewers can see and choose to receive reminders for.
- Add Fundraiser – choose a fundraiser to add to your Reel & as well as your profile for 30 days. Instagram takes care of all the donation processing with no fees.
- Recommend to Facebook – when you turn this on, it will be shown to users on Facebook with your Instagram handle.
- Advanced Settings – turn on and off advanced features like letting others use your template, scheduling the Reel, hiding like counts, showing captions, allowing people to download your Reel, and data usage for video quality uploading.
- If you’re ready to post, tap “Share” to publish your work. If not, tap “Save draft” to continue working on it later.
Extra Tips for Instagram Reels & Stories
Some general tips when utilizing the platform include:
- Use Stories to maintain your followers and promote your products
- Use Reels for gaining new followers and boosting engagement
- Post Reels to your main Instagram feed by selecting “Also Share to Feed” when you publish a Reel
- Use Instagram Stories to promote your newest Reels
- Reels can now be up to 15 minutes long, but most successful Reels are between 10 and 90 seconds.
- Utilize the captions and hashtags of your Reels
- Engage with other accounts’ Reels and Stories
- Don’t be shy about posting!
Instagram Stories & Reels offer unique and engaging ways to express your brand’s creativity and share content. With both features of Instagram, you can reach a wider audience and engage followers while staying connected with the latest trends. Both tools allow you to connect, inspire, and entertain your followers on the platform.
Contact our office today if you need help with your social media platforms or content creation!